


Sunday, December 25, 2011

Friday, December 16, 2011
Chocolate Peppermint Christmas Cupcakes (GF)

As many of you probably know, "National Cupcake Day" was a big trending topic on Twitter yesterday. In recognition of this special day loved by cupcake connoisseurs everywhere, I decided to do a Christmas Cupcake post.
These cupcakes are a deliciously moist chocolate cake filled with peppermint pastry cream and topped with vanilla swiss meringue buttercream. If you're an avid pinterest user, or just follow a lot of baking blogs, you've probably seen these frosted Christmas tree cupcakes. They're festive and clever, as well as super easy to make.

Another easy and impressive cupcake floating around the web are these "North Pole" cupcakes. I've made both versions with purposefully non-traditional Christmas colors, just because I like that sort of thing.

For the Chocolate Cupcakes Makes 2 dozen cupcakes
2/3 cup superfine sweet rice flour
1/4 cup sorghum flour
3/4 cup potato starch
1/2 cup, plus 2 tbsp good quality cocoa powder
2 1/2 tsp baking powder
1/2 tsp salt
1/4 tsp xanthan gum
1 cup milk
3 tbsp unsalted butter
4 eggs
2 cups granulated sugar
Pre-heat oven to 350 degrees. Sift together flours, starch, cocoa powder, xanthan gum, baking powder, and salt. Set aside.
Using a stand mixer, beat eggs with paddle attachment until foamy. Add sugar and mix for another 5-6 minutes until thick and fluffy.
While eggs are mixing, heat milk and butter on stovetop until butter melts.
Reduce mixer speed to low and pour in hot milk/butter. Add flour mixture 1/4 cup at a time until combined. Fill cupcake liners 2/3 full with batter and bake for about 20 minutes, until a toothpick inserted into center of cake comes out clean.
For the Peppermint Pastry Cream:
3 cups heavy whipping cream
2 tsp vanilla extract
8-9 candy canes, broken up into large pieces
3/4 cup sugar
4 eggs, plus 2 egg yolks
1 tbsp cornstarch
1-2 drops pink food coloring
Heat the whipping cream, vanilla extract, and candy canes in a small saucepan over medium heat until cream is hot and bubbly and candy canes are almost all melted. Strain mixture to remove leftover hard pieces of candy and place back in sauce pan. Add food coloring.
Whisk together sugar, eggs, egg yolks, and cornstarch. Slowly add in hot cream mixture, whisking continuously to temper the eggs. Add mixture back into sauce pan and heat longer (if necessary) until thickened. Strain one more time through sieve and place in fridge, covered with wax paper or plastic until fully cooled.
For the Swiss Meringue Buttercream:
4 egg whites
1 cup granulated sugar
2 tsp vanilla extract
3 sticks butter, unsalted
Combine egg whites and sugar in heat resistant bowl. Place bowl over a pan of simmering water, creating a "double boiler" and continuously whisk until egg white mixture reaches 160 degrees on a candy thermometer. Remove bowl from water and whisk egg whites/sugar using hand mixer or stand mixer until thick and fully cooled. Once fully cooled, add butter in piece by piece, mixing well after each addition. Once butter is fully incorporated, switch to paddle attachment and add vanilla extract. Mix for 2-3 minutes.
To Assemble:
Using a small paring knife, cut out the center of each cupcake. Fill each cupcake with pastry cream by using a plastic bag with the corner cut or a pastry bag. Once all cupcakes are filled, decorate as follows.
To Decorate:
For the North Pole Cupcakes
Preferably the night before decorating the cupcakes, cut out small squares of white fondant and allow to dry (lightly covered) overnight. Using an edible food pen, write "North Pole" on each square.
Using candy sticks or candy canes of your choice, stick into center of frosted cupcake. Attach "sign" to each candy cane with a bit of melting chocolate.
For the White Christmas Tree Cupcakes
Using a pastry bag fitted with a large star tip, frost each cupcake starting from the outside rim of the cupcake and make each subsequent layer narrower, so that the frosting resembles a tree shape. Create ornaments by using round or ball sprinkles of your choice (you can also cut small circles with fondant). The star topper was created by cutting small stars out of rolled marshmallow fondant. The stars were painted with a thin layer of corn syrup and rubbed into edible glitter.

Wednesday, December 7, 2011
Glittering Lemon Sandwich Cookies (GF)
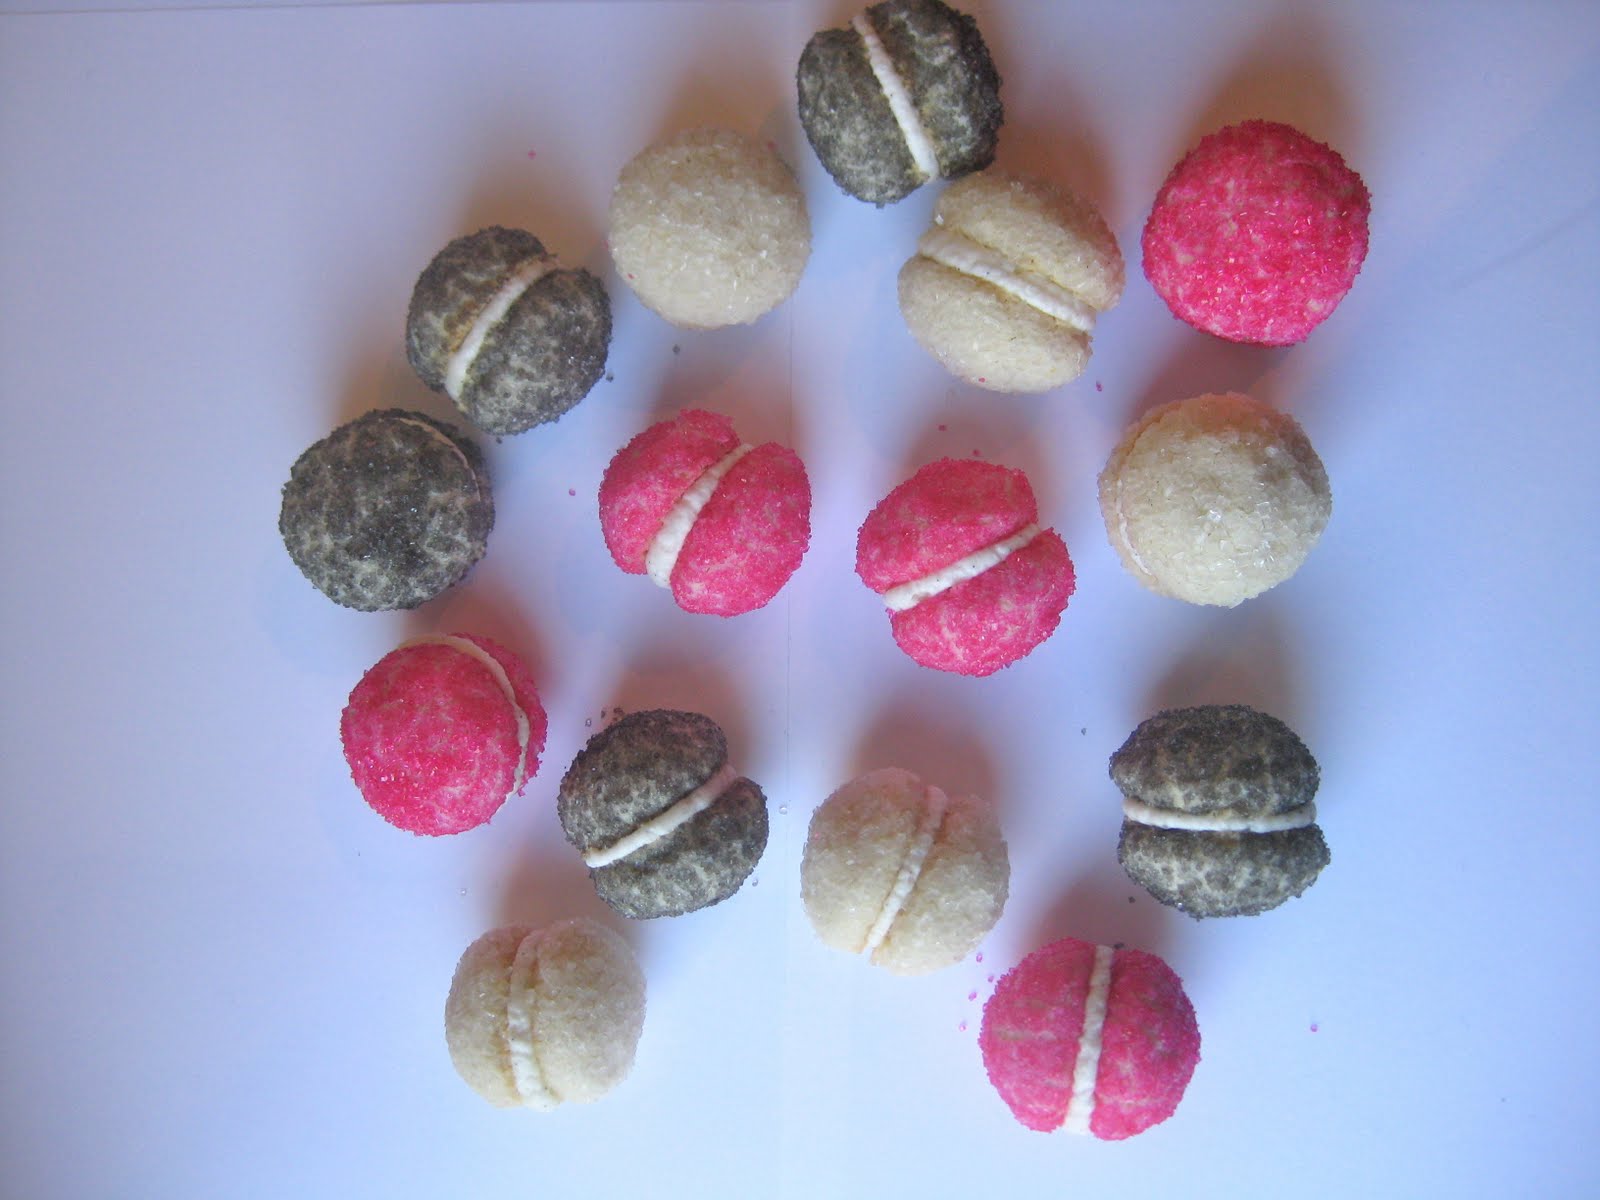
For those of you who are Pinterest addicts, you might recognize this cookie because it is totally one of those "most pinned" celebrity status recipes. These beautiful glittery lemon sandwich cookies were originally posted in Epicurious and are an obvious choice for holiday cookie baking and entertaining. They look like little sparkling ornaments and are crumbly, light cookies that melt in your mouth.
In order to give these cookies a more refined taste, I used meyer lemons instead of regular lemons, which are sweeter. I also made my own filling, rather than the one provided with the recipe.

For the Glittering Lemon Sandwich Cookies: (gluten free)
1/3 cup sorghum flour
1/2 cup almond meal
2/3 cup sweet rice flour
1/3 cup potato starch
1/3 cup cornstarch
1/2 tsp xanthan gum
1/4 tsp salt
2 sticks butter, unsalted
1/2 cup confectioner's sugar
1 tbsp meyer lemon zest
1 tsp lemon juice
1 tsp vanilla extract
*Recipe adapted from Epicurious. Non-gluten free readers may replace flour mixture with 1 1/3 cups all purpose flour and 2/3 cup cornstarch, per the original recipe.
Pre-heat oven to 350 degrees and line 2 baking sheets with parchment paper or silpats. Choose sanding sugars of your choice and pour liberal amount of each color into separate small, deep bowls. Sift together flours, starches, xanthan gum, and salt. Set aside. Cream together butter and powdered sugar. Add lemon zest, juice, and vanilla extract. Using hand or stand mixer on low setting, slowly add flour mixture.
Measure out scant teaspoons of dough and shape into balls. Drop balls one at a time into sanding sugar, tossing and turning to coat completely. One baking sheet is full, place in freezer for 5-10 minutes (chilling the dough helps the cookies keep their cute shape in the oven). Bake cookies for 10-13 minutes.
For the Meyer Lemon Filling:
1 1/4 cups powdered sugar
1 stick butter, unsalted
2 tbsp whole milk or cream
1/2 vanilla bean or 2 tsp vanilla bean paste
2-3 tbsp meyer lemon juice (depending on tanginess preference)
Combine all ingredients in bowl of stand mixer and beat with paddle attachment until fully combined and creamy.
To assemble, use a heavy duty freezer bag (snip the corner off with scissors) or a pastry bag to pipe a small amount of filling on one side of each cookie. Sandwich together.

Sunday, December 4, 2011
Chocolate Pots de Creme

Is it just me or does it feel like Christmas is going to be upon us any minute now?
Somehow, Mr. Pixie Crust and I are booked every weekend in December. Last night was our first Holiday event- an indie music concert sponsored by KCRW (NPR). Adult concerts are fun! The show was at a beautiful old theater in downtown LA, which was a vast contrast to the small ska/indie concerts I frequented during adolescence- small, divey clubs packed with jumping, moshing and sweaty teenagers. It was truly fantastic to have a cushioned seat and no one stepping on my feet or pushing me into the tangled arms and feet of a mosh pit.
I'm sure there are holiday parties on the horizon that you all are hosting or attending and for those occasions, chocolate pots de creme make a rich and delicious dessert, yet are extremely simple to make. You can even make them 2 days before serving.
The garnish is simply a fresh mint leaf and a "pine cone" made out of sliced almonds stuck into a ball of fondant. For the pine cone, I highly recommend using marzipan instead, if possible, fondant was kind of a pain to use- I had to add a little water and shortening to each little ball to increase pliability. I like the addition of the garnish because it gives this dessert a wintery, yet elegant touch.
For the Chocolate Pots de Creme (from Epicurious)
2 cups heavy whipping cream
1/2 cup whole milk
5 ounces bittersweet or semisweet chocolate, chopped
6 large egg yolks
1/3 cup sugar
Preheat oven to 325°F. Bring cream and milk just to simmer in heavy medium saucepan over medium heat. Remove from heat. Add chocolate; whisk until melted and smooth. Whisk yolks and sugar in large bowl to blend. Gradually whisk in hot chocolate mixture. Strain mixture into another bowl. Cool 10 minutes, skimming any foam from surface.
Divide custard mixture among six 3/4-cup custard cups or soufflé dishes. Cover each with foil. Place cups in large baking pan. Add enough hot water to pan to come halfway up sides of cups. Bake until custards are set but centers still move slightly when gently shaken, about 55 minutes. Remove from water. Remove foil. Chill custards until cold, about 3 hours. (Can be made 2 days ahead. Cover and keep chilled.)

Thursday, December 1, 2011
Double Vanilla Birthday Cake (GF)

Like many other 20-somethings I know, I'm in the midst of what you might call an early adulthood crisis. I'm a few years out of college and I have a full-time job, but it's definitely not what I would call the job on the path to my dream career. In fact, I sort of just fell into doing what I do.
I've always been a dreamer and someone who thrives on creative pursuits. And while my job now is certainly not an area I imagined myself working in as a doe-eyed college student, I am definitely enjoying the fact that I have plenty of time to figure out what I really want to do.
My job can be really frustrating at times. I hate battling traffic at rush hour every morning and evening. I dislike the particular monotony of office culture- eating at scheduled times, taking 15 minute breaks in the sad, gray employee lunchroom, sitting at a desk for 8 hours- it just stunts creativity. I could go on...
What I love, however, is pretty much everyone I work with. One person who fits into this category is my co-worker, Susan. When I found out it was her birthday yesterday, I came up with this recipe for a Double Vanilla Birthday cake, which is a vanilla bean sponge cake layered with vanilla bean French buttercream and topped with a fondant flower.
PS: Vanilla beans are normally really expensive, so usually I'll use vanilla bean paste instead, but if you have a Trader Joe's near you check out their holiday baking section. The stores in Los Angeles are selling two Madagascar Vanilla Beans for FOUR DOLLARS, which is extraordinarily cheap. I've totally stocked up on them. I also shared my excitement with the cashier there, who looked pretty amused by my reaction.

For the Vanilla Bean Sponge Cake (makes two 7 or 8-inch cakes):
1/3 cup superfine sweet white rice flour
2 tbsp sorghum flour
1/4 cup, plus 1 scant tbsp potato starch
2 tbsp cup corn starch
1 3/4 teaspoon(s) baking powder
pinch xanthan gum
1/2 cup whole milk
2 tbsp unsalted butter
2 large eggs
1 cup granulated sugar
One half of a vanilla bean
1/4 tsp Salt
Butter and flour pans and line bottoms with circles of parchment paper. Set aside. Pre-heat oven to 350 degrees. Sift flours, starches, baking powder, and salt together. Set aside.
Using a stand mixer, beat eggs until foamy. In the meantime, heat milk and butter together on stovetop until milk is hot and butter is melted. Turn off stove.
Add sugar to eggs and continue beating for 5-6 minutes until batter becomes creamy and fluffy. Cut vanilla bean lengthwise and scrape out seeds into batter.
Add milk and melted butter and beat until combined. Add flour mixture 1/4 cup at a time, scraping the sides of the bowl occasionally. Once batter is fully combined, pour equal amounts into each pan. Bake for 25-30 minutes at 350 degrees. Insert a toothpick and gently press the tops of the cakes to check when
Allow cakes to cool in pans for about 15 minutes.
For the Vanilla Bean French Buttercream:
1 whole egg
2 egg yolks
1/3 cup water
1 cup granulated sugar
3 sticks unsalted butter
1 1/2 vanilla beans
Combine water and sugar in a small sauce pan and heat until temperature reaches soft ball stage- 240 degrees on a candy thermometer. While mixture is heating, add egg and egg yolks to bowl of a stand mixer and beat with whisk attachment. Once syrup reaches appropriate temperature, immediately remove from heat. With mixer running on low-medium slowly pour sugar syrup into eggs to "temper" them. Once all syrup is added, continue to mix on medium- high with whisk attachment until mixture has fully cooled. Cut up butter into small pieces. Once mixture is cooled, add butter piece by piece, mixing well after each addition. Once butter is all incorporated, switch to a paddle attachment. Add vanilla bean seeds. Mix on medium-high for about 2 minutes. Add food coloring as desired (I used AmeriColor Yellow).
Frost cake and decorate as desired.

Saturday, November 26, 2011
Browned Butter Sweet Potato Cupcakes with Marshmallow Frosting (GF)

I hope all of you had a happy Thanksgiving! I'm sharing one of the two desserts I made for Thanksgiving dinner- Sweet Potato Cupcakes filled with cinnamon pastry cream and topped with marshmallow frosting.
It really seems like Christmas came earlier this year- this climate of early festivity has of course been driven by consumerism and marketing by major retail corporations, but personally, I'd rather focus on the seasonal charm of it all. I started listening to Christmas music a couple of weeks ago, so that pretty much shows where I stand on the subject. You see, I know many people who staunchly say that Christmas music should not be played, nor Christmas movies aired or viewed, until after Thanksgiving. I'm usually with them, but this year I was kind of into the fact that I could listen to vintage holiday songs in the midst of miserable Los Angeles traffic earlier in the season.
I am also one of those people that continues to bake with pumpkin and sweet potato through Christmas, so I hope you are too! These turned out pretty tasty- I recommend them for your next holiday get together.
Browned Butter Sweet Potato Cupcakes (Gluten Free) (makes about 22 cupcakes)
1 cup superfine sweet rice flour
1/2 cup sorghum flour
1/4 cup superfine brown rice flour
1/4 cup almond flour
1/2 cup potato starch
1/2 cup cornstarch
1/4 tsp xanthan gum
3 1/2 tsp baking powder
1/2 tsp salt
1/2 tbsp cinnamon
1 1/2 sticks butter, unsalted and browned (see below)
3 large eggs
1 1/2 cups brown sugar
1/4 cup granulated sugar
2 tsp vanilla extract
1 1/4 cups sweet potato puree
1/4 cup water
Pre-heat oven to 350 degrees. Sift together flours, starches, xanthan gum, baking powder, salt and cinnamon. Set aside. Line 2 12-cup muffin pans with cupcake liners (I found that this recipe only made 22 cupcakes, but I tend to fill my cups a bit fuller).
Cut butter into slices and place in small saucepan over medium heat. Melt butter and continue cooking, stirring constantly, until butter turns a light brown shade and smells nutty. Once browned, place butter in a plastic dish and put in fridge or freezer to cool completely.
Once butter is cooled, place in bowl of stand mixer with sugar and cream together for 1-2 minutes. Add eggs one at time, mixing well after each addition. Add vanilla extract. Once batter is thick and creamy looking, add dry ingredients, in three additions, alternating with water and sweet potato puree. Fill cupcake liners about 1/2-2/3 full and bake at 350 degrees for 20-22 minutes.

For the Cinnamon Pastry Cream:
2 cups whole milk
2 tsp vanilla extract
1 cinnamon stick
1 tsp ground cinnamon
1 1/2 tbsp cornstarch
1/2 cup sugar
1/4 tsp salt
2 eggs
Place milk, vanilla, cinnamon stick and ground cinnamon in a saucepan and heat to a boil.
While the milk is heating, mix the cornstarch, sugar and salt.
Gradually add the eggs to the dry mixture and mix until smooth.
Slowly add 1/3 of the hot milk while whisking constantly. Then, pour the mixture back into the saucepan and return to the heat, stirring constantly with a whisk or spoon until the mixture comes to a boil and thickens.
Remove the cinnamon stick.
Pour into a large shallow bowl and cover the surface with plastic wrap or parchment to prevent a skin. Cool down a bit before putting in the refrigerator.
For the Marshmallow Frosting:
-2 1/2 sticks unsalted butter at room temperature
-1 7-ounce jar Marshmallow Fluff/Creme
-1 1/2 cups confectioner's sugar
-1/4 cup heavy cream
-2 tsp vanilla extract, or 1/2 vanilla bean
Combine butter and marshmallow cream. Add in confectioner's sugar, cream, and vanilla. Mix until fully combined and creamy.
To Assemble:
Core out the center of each cupcake using a small paring knife. Fill a pastry bag with cinnamon pastry cream and pipe into each cupcake. Frost and decorate as desired.
I made homemade marshmallows earlier in the week, so I melted these down and added water instead of using marshmallow cream in the frosting. Homemade marshmallows are like another world compared to the store bought kind- they're like soft, delicately sweet pillows. I even really enjoy the store bought ones, but they really can't compare with these. They're also super easy to make. Check out the recipe on my past Scotchmallow Heart Candies post.

Thursday, November 17, 2011
Strawberry Sponge Ruffle Layer Cake (Gluten Free)


I am a total sucker for all things girly. When I was in the middle of wedding planning a couple of years ago, I saw ruffle cakes like this one EVERYWHERE and I was smitten. Not only because the all over ruffles create such a pretty, feminine effect, but because the cake struck me as being inspired by the fashion of the season also. Ruffles are still very in, but they were REALLY in a few seasons ago. This fact inspires me to create a cake with a sequined effect as an homage to the current season (post to come).
This particular cake is a strawberry sponge cake filled with cream cheese strawberry frosting and covered in vanilla swiss meringue buttercream. The cake turned out DELICIOUS. It's wonderfully moist and has Nestle Strawberry Milk powder to create the strawberry flavor.
For the Strawberry Sponge Cake
*Makes four 7-inch round layer cakes
2/3 cup superfine sweet white rice flour
1/4 cup sorghum flour
1/2 cup, plus 1 1/2 tbsp potato starch
1/4 cup corn starch
2 1/2 teaspoon(s) baking powder
1/4 tsp xanthan gum
1 cup milk (you may also use another non-dairy milk)
2 tbsp unsalted butter
4 large eggs
1 1/2 cups granulated sugar
2/3 cup powdered strawberry milk
1/2 tsp Salt
Butter and flour pans and line bottoms with circles of parchment paper. Set aside. Pre-heat oven to 350 degrees. Sift flours, starches, baking powder, and salt together. Set aside.
Using a stand mixer, beat eggs until foamy. In the meantime, heat milk and butter together on stovetop until milk is hot and butter is melted. Turn off stove.
Add sugar to eggs and continue beating for 5-6 minutes until batter becomes creamy and fluffy. Add vanilla extract.
Add milk and melted butter and beat until combined. Add flour mixture 1/4 cup at a time, scraping the sides of the bowl occasionally. Once batter is fully combined, pour equal amounts into each pan. Bake for 25-30 minutes at 350 degrees. Insert a toothpick and gently press the tops of the cakes to check when
Allow cakes to cool in pans for about 15 minutes.
NOTE: Due to my limited oven space and the fact that I only have two 7-inch cake pans, I mixed and baked two sets of 2 cakes separately. It wasn't too much more work this way since this is a pretty easy and quick cake to mix up.
For the Strawberry Cream Cheese Frosting
2 sticks unsalted butter
2/3 block of cream cheese (room temperature)
1 cup of strawberries, diced
2 cups confectioner's sugar
1 tsp vanilla extract
Place sliced, washed strawberries in food processor and chop using short pulses until strawberries are diced into very small pieces, but NOT pureed. Set aside. Cream butter and cream cheese together until well combined. Add powdered sugar and mix until fully incorporated. Add vanilla. Add strawberries and mix until just combined.
For the Swiss Meringue Buttercream:
4 egg whites
3/4 cup granulated sugar
4 sticks butter, unsalted
2 tsp vanilla extract
Slice butter into small pieces and set aside. Combine egg whites and sugar in metal mixing bowl. Create a double boiler by placing over an appropriately sized saucepan filled with simmering water (stove should be kept on). Whisk egg whites by hand on stove top (do not allow water to enter the mixing bowl) until temperature registers 160 degrees, or until all of the sugar is melted and egg whites are foamy. Place mixing bowl on stand mixer and beat using whisk attachment until mixture is a thick meringue and is fully cooled. Once mixture is cool, add butter in piece by piece and slowly until all is incorporated (mixture may appear curdled, but it will whip up nicely, don't worry). Once butter is incorporated, use paddle attachment to beat for another 2-3 minutes.
Add vanilla and pink food coloring- mix until fully incorporated.
To assemble/decorate the cake:
Place one cake layer on a round cake board, or cake stand. Spread about 1/3 cup of the strawberry cream cheese frosting on top. Place another cake layer on top of the first later and repeat with remaining layers/frosting until all four layers are stacked.
Spread a thin layer of swiss meringue buttercream all over the cake until covered, but very thinly (the cake does not need to be perfectly covered because the ruffle layer will also be added).
Fit a large pastry bag with a #103 Ateco tip. Fill pastry bag with remaining swiss meringue buttercream. With the narrow part of the tip facing you, point pastry bag and tip straight down, making left to right motions to create ruffles. Continue around the entire side surface of the cake.


Subscribe to:
Posts (Atom)