Thursday, July 28, 2011

Alice in Wonderland Part 2


Here are the official lovely photos from Jennifer Jasso's daughter's Alice in Wonderland themed 1st birthday party. All photos are by Jennifer Jasso.

At the end of the photos, see directions for the fondant decorations in the photos.


Fondant Decoration Tips:

I used marshmallow fondant tinted in various shades for all of the decorations. Edible food pins were used to add details to the tea cups, clocks, playing cards and Mad Hatter hats.

Marshmallow Fondant Recipe:

-4 cups mini marshmallows
-4 cups confectioners sugar
-2 tbsp water

Combine the marshmallows and water in a microwave safe bowl and microwave for 30 seconds. If the marshmallows are not fully melted when stirred, microwave for another 15-30 seconds. Stir marshmallow until completely smooth and if possible, add food coloring at this stage (kneading in the food coloring after making a white batch certainly works, but is messy and kind of a pain in the butt). Add powdered sugar until it will not mix any longer. Knead with hands and continue to add powdered sugar until mixture is a play-doh consistency and is no longer sticky.

To roll out, sprinkle confectioners sugar on a clean, flat surface and roll with a plastic fondant pin.

Mad Hattar Hats:

A marshmallow was wrapped in green fondant and then I added a circular disc of fondant to the bottom of the marshmallow with a bit of buttercream. I wrote the 10/6 on a small square of white fondant and attached this to the hat with buttercream as well.

Tea Cups:

I'm pretty positive there is an easier way of creating tea cups from fondant, but I basically used a "pinch pot" method until I had the right size and smoothness. These were very time consuming. I then rolled a small snake of fondant and attached it to create the handle.

Clocks:

These were very simple. I cut out circles of white fondant and drew on a yellow rim around the clock with an edible food pen. Edible food pens were also used to draw on the clock's dashes and numbers.

Playing Cards:

These were also pretty easy. I cut out small, thick rectangles from white rolled fondant and drew the numbers and suits on with edible food pen.

NOTE: Prior to drawing and fondant and using on cupcake, allow to dry to a sturdy consistency.

Monday, July 25, 2011

Harry Potter Cupcakes: Pumpkin cake filled with homemade butterscotch


Most of you probably don't know how much I LOVE Harry Potter and children's literature in general.  I am truly a fan of the books and a big admirer of J.K. Rowling.  For Part 2 of Deathly Hallows, my husband and I unfortunately could not make it to the midnight showing of the film because it was a crazy busy weekend, but we did take our first trip to Whimsic Alley, an amazing Harry Potter themed shop in Los Angeles.  I purchased a Gryffyndor cardigan and Ali got a Gryffyndor tie.  Not only do they have a wand area, a clothing area (complete with actual robes) and a bunch of other really awesome merchandise, but the store looks just like Diagon Alley and has a Great Hall for Potter themed parties (is 26 too old to have a birthday there?)

For these cupcakes inspired by Harry Potter, I wanted the flavors to reflect foods common to the Wizarding world.  I know we're smack dab in the middle of summer, but since they often drink Pumpkin Juice and Butterbeer in the books, I decided to do a combination of pumpkin and butterscotch.  These cupcakes are pumpkin flavored cake filled with homemade butterscotch sauce and topped with cinnamon brown sugar swiss meringue buttercream.


For the Pumpkin Cupcakes:

1 1/2 cups AP flour
1 1/2 cups Cake flour
3 tsp baking powder
1 1/2 sticks unsalted butter
3 large eggs
1 tbsp pumpkin pie spice
2 tsp cinnamon
1 1/2 cups brown sugar
1/4 cup granulated sugar
1 1/4 cups pumpkin puree
1/4 cup water

Sift cake flour, AP flour, baking powder and spices together and set aside. Cream butter and brown/white sugars together by beating with paddle attachment of stand mixer for 3-4 minutes. Add in eggs one at a time. Add 1/2 of dry ingredients, alternating with pumpkin puree and water. Mix until well combined.

Fill cupcake liners 2/3 way full with batter and bake at 350 degrees for about 20 minutes, or until cupcakes spring back to touch.

For Butterscotch sauce filling (recipe courtesy of Smitten Kitchen):

1 stick unsalted butter
1 cup brown sugar
1 cup heavy cream
1 1/4 tsp sea salt
1 tbsp vanilla extract

Melt butter in a medium heavy-bottomed saucepan over medium heat. Add the sugar, cream and salt and whisk until well blended. Bring to a very gentle boil and cook for about five minutes, whisking occasionally. Whisk in the vanilla after sauce is removed from heat.

Place sauce in fridge until cooled.

For the Brown Sugar Cinnamon Swiss Meringue Buttercream:

4 egg whites
1 cup brown sugar
3 sticks unsalted butter
1 tbsp vanilla
3 tsp cinnamon

Simmer water in medium sized saucepan. Combine egg whites and brown sugar in large heat resistant mixing bowl and place mixing bowl inside of saucepan (DO NOT allow water to enter mixing bowl). Whisk continuously until sugar is fully dissolved and mixture is slightly foamy and bubbly (should register 160 degrees on a candy thermometer).

Place mixing bowl on stand mixer with whisk attachment. Beat on high for several minutes until mixture is thick and whipped, like meringue. Once mixture is fully cool, beat in butter one piece at time, mixing well after each addition. After all butter is added, switch to a paddle attachment and beat for an additional 2-3 minutes. Add in the vanilla extract and cinnamon and beat to combine.

To assemble:

Once cupcakes are fully cooled, core out the center of each one with a small paring knife. Pipe cooled butterscotch into the center of each cupcake. Once all cupcakes are filled, pipe buttercream on top of each cupcake.


For the fondant decorations:

I used Harry Potter "temporary tattoo kits"to make these edible decorations, which are really rubber stamps that come with "temporary tattoo ink."  The stamp kits can be purchased directly from Whimsic Alley's website.  To use, apply ink from edible food pens (you could also use food coloring mixed with some alcohol or vanilla, but the food pens are super easy because you can apply them directly on the stamp and the color dries really quickly) and stamp just like you would on a piece of paper.

For the Hogwarts Crests:
  • Draw a crest shape on a piece of thick card stock and cut it out with scissors.  HINT: If you're unhappy with the way your crest comes out, you can print a picture of an appropriate sized crest from the internet.   
  • Place the card stock crest on top of a piece of rolled white fondant and cut along the edges of the crest with a sharp paring knife. 
  • Allow the crests to dry until they are easy to draw on (give it at least a couple of hours).  Once they are dry, draw a cross through the center of the crest diagonally and horizontally in orange. 
  • Fill in each section of the crest with the appropriate colors using food pens (this is also why the food pens are a more convenient tool than food coloring). You could make red, blue, green, and yellow fondant and cut it to fit the crest. 
  • Once the colors are dry, add black edible ink to Hogwarts Crest stamp and press firmly onto the crest.  Fill in any gaps or sparse areas with the black pen.
For the HP logo discs:
  • Create a batch of fondant in your choice of color (I used a mixture of Americolor yellow, orange and gold to create mine)
  • Roll out fondant and cut into disc shapes (you don't have to use an actual fondant/gumpaste cutter- I used the top of one of my spice containers because I liked the size)
  • Allow each disc to dry for 1-2 hours or overnight before writing on them
  • Apply edible black ink to "HP" logo stamp and press firmly into disc.  Fill in any gaps/sparse areas with black pen.
For the Snitches:
  • Create a batch of gold colored fondant and white fondant
  • Trace wing shape onto a piece of card stock and cut out to use as a stencil
  • Cut out wings from white fondant
  • Roll gold fondant into small balls
  • Allow the snitch balls and wings to dry 
  • Apply wings to snitch body by using a bit of melted white chocolate or buttercream

Sunday, July 17, 2011

Down the Rabbit Hole


This weekend I made Alice in Wonderland cupcakes and cookies for an Alice themed birthday. It was a lot of work, but fun for me because I was an Alice fanatic growing up (and I still am a little bit). I have an enormous collection of snow globes, porcelain figurines, dolls, etc.

And I must say that it's a good thing that I love Alice almost as much as Harry Potter because doing these cupcakes and cookies caused me to have to see the movie next week instead of opening night AND postpone a pending Potter pastry extravaganza (you'll see- it'll be good).

More photos and instructions are to come! Happy weekend to all! I hope all my fellow Angelenos avoided Carmageddon.


Saturday, July 9, 2011

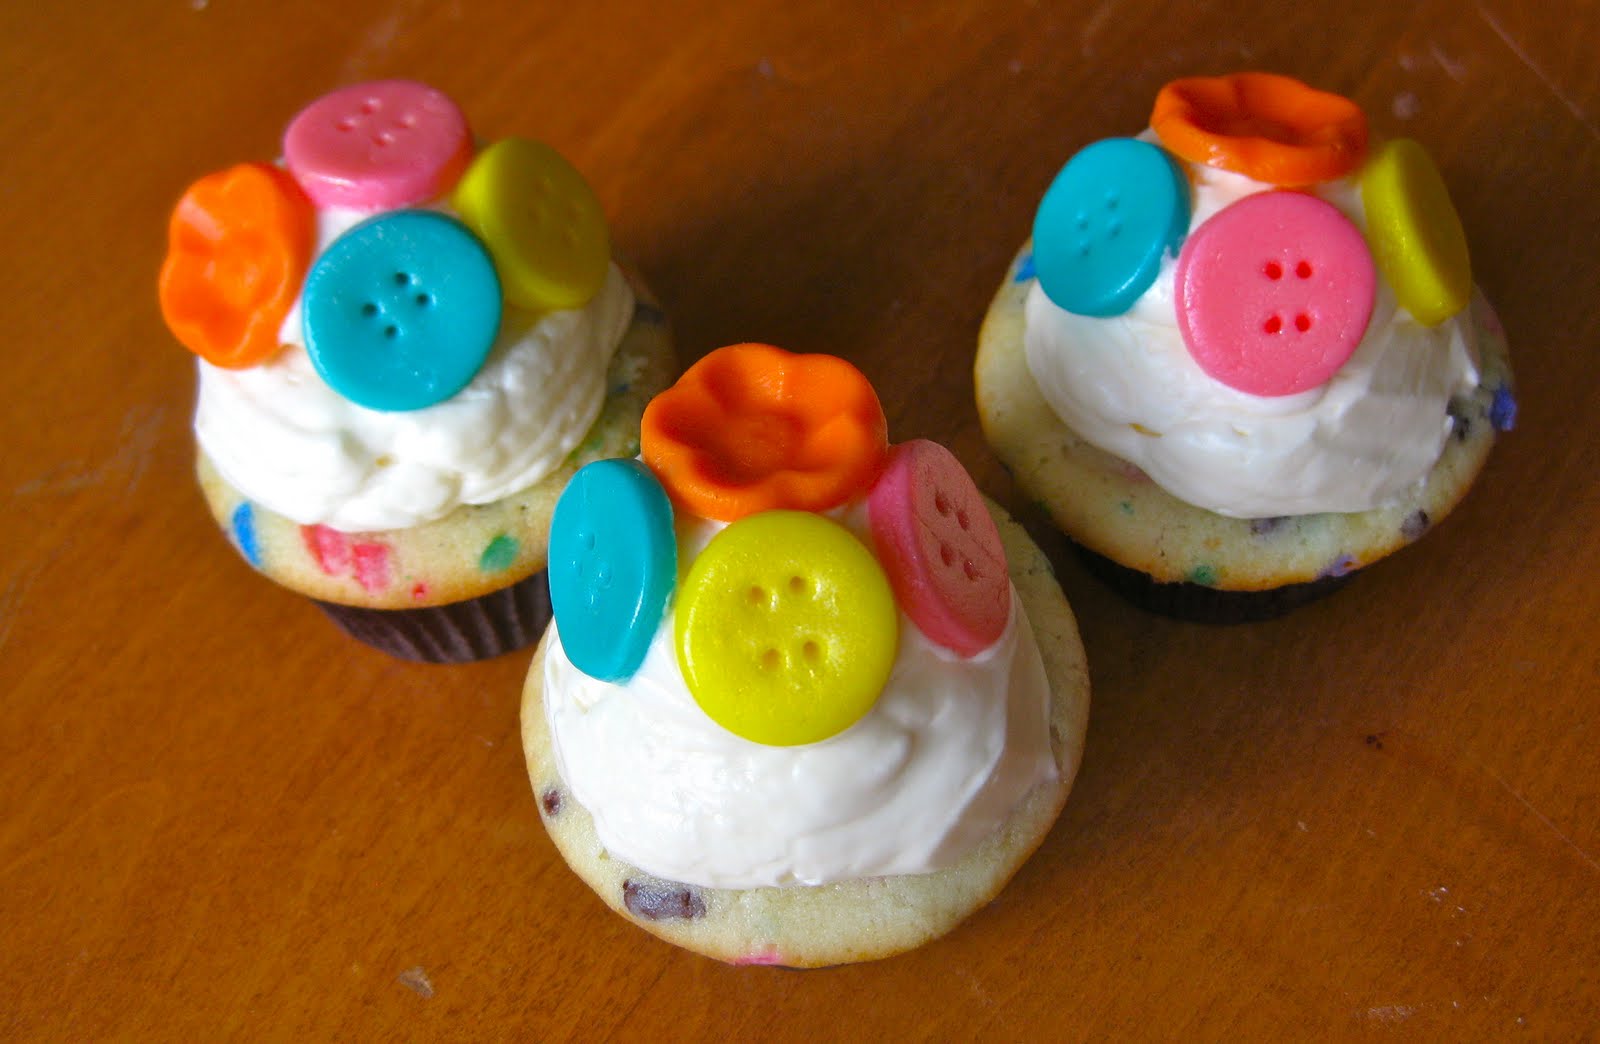
Funfetti Button Cupcakes


I love all things vintage and kitschy cool. At my husband and my wedding last year (it'll be one year on August 13th!) we had hanging mason jars on the aisle ways that held buttons and homegrown flowers. It was my aunt's idea, who did the arrangements. My other aunt grew the majority of the flowers in her backyard and drove them down from Napa, CA to Orange County, CA in an ice chest! It was amazing.

These cupcakes pay homage to those buttons (pictured below). They are also dedicated to Liam "Yellowbirddd" McCormick, Ali's (aka Mr. Pixie Crust) best man, who probably appreciated this wedding detail the most! :)


Wedding photography by Marc Olivier.


The circular buttons were made by cutting circles out of colored fondant and punching holes with a toothpick. The flower buttons were made with Mercken's candy wafers and a button chocolate mold from Bake-it-Pretty.


For the Funfetti Cupcakes (makes 36 mini cupcakes or 12 regular cupcakes)
Ingredients
3/4 cups AP Flour
3/4 cups cake flour
1/2 tsp baking powder
1/2 tsp baking soda
1/4 tsp salt
1 stick unsalted butter, softened
Scant cup granulated sugar
2 eggs
1/2 cup sour cream
2 tbsp whole milk
1/2 cup rainbow sprinkles

Sift all of the dry ingredients together. Set aside. Cream sugar and butter together until light and fluffy. Add in eggs, one at a time. Add 2/3 flour mixture to wet ingredients and mix just until almost combined. Add in the milk and sour cream. Add in the remaining flour mixture and mix until combined. Stir in rainbow sprinkles.

Bake at 350 degrees for about 15-20 minutes, or until cupcakes spring back to the touch.

For the French Buttercream
-1 cup sugar
-1/3 cup water
-2 eggs
-3 sticks unsalted butter
-2 tsp vanilla extract

Place eggs in mixer and mix with whisk attachment until foamy. Meanwhile, place water and sugar in a small sauce pan over medium heat, stirring. Continue boiling until mixture reaches 240 degrees on a candy thermometer. Pour hot syrup into eggs as mixer is running. Make sure to pour slowly and aim for the center of the bowl. Continue whipping until mixture is fully cooled. Add butter a piece at a time, mixing well after each addition. Once butter is all added, switch to a paddle attachment and beat for another 2 minutes or so.

Friday, June 24, 2011

Caramel Frappuccino Cupcakes


This cupcake takes me back to my Starbucks days. I worked the opening shift in college, which meant getting there at 4:30 AM, bleary eyed and half dazed, filling the pastry case and waiting for the mob of high strung customers. I do actually kind of miss it...

This cupcake is a coffee flavored cake filled with coffee mousse and homemade caramel sauce, and topped with swiss meringue buttercream drizzled with caramel. It was a pretty big hit at work, so I suggest making it to all of you Starbucks fans.

For the Cupcakes (makes 24 cupcakes):
Recipe heavily adapted from Apartment Therapy's The Kitchn

3/4 cup whole or low-fat milk
1/4 cup sour cream
3 heaping teaspoons instant coffee
1 tbsp vanilla
3 cups cake flour
2 1/2 teaspoons baking powder
1/2 teaspoon baking soda
1 teaspoon salt
2 teaspoons very finely ground coffee
2 teaspoons unsweetened natural cocoa powder
3/4 cup butter at room temperature
1 1/2 cup white sugar
4 eggs, yolks and whites separated

Heat the milk in the microwave or on the stove until hot - stop short of a simmer. Stir in the instant coffee until well blended. Add the vanilla and set aside.

Sift together the cake flour, baking powder, soda, salt, ground coffee and cocoa.

In the bowl of a stand mixer, beat the butter and sugar with the paddle attachment until creamed. It should be slightly fluffy. Beat in the egg yolks one at a time.

Add 2/3 of the flour mixture and the sour cream. Add the remaining flour mixture and milk. Beat until smooth.

Scrape all the batter out into a separate bowl and wash the mixer bowl thoroughly.

Switch to the whisk attachment and beat the egg whites until stiff but not dry. They will hold a stiff peak but they will still slip around a little in the bowl.
Fold the egg whites into the cake batter gently, folding the batter around until well combined.

Fill cupcake liners with batter and bake at 350 degrees for about 20 minutes (they baked up surprisingly fast).


For the Coffee Mousse (Recipe from Epicurious)

3/4 cup plus 2 tablespoons sugar
6 large egg yolks
1/3 cup water
3 tablespoons instant espresso powder
1/2 teaspoon ground nutmeg

2 1/2 cups chilled whipping cream
2 tablespoons coffee liqueur
1 teaspoon vanilla extract

NOTE: I cut the above recipe in half by eyeballing it (a lot of the measurements don't make for an easy division). I also used Starbucks Via Instant Coffee instead of instant espresso and cut out the nutmeg.

Whisk sugar, yolks, water and espresso powder in large metal bowl. Set bowl over saucepan of simmering water (do not allow bowl to touch water); whisk until candy thermometer registers 160°F, about 3 minutes. Remove bowl from over water. Add nutmeg. Using electric mixer, beat egg mixture until cool and thick, about 5 minutes.
Beat cream, liqueur and vanilla in another large bowl until stiff peaks form. Fold cream mixture into egg mixture.

Homemade Caramel Sauce (caramel recipe courtesy of Giver's Log)
Tools/Equipment:
3-4 quart saucepan
candy thermometer

Ingredients:
1 cup unsalted butter (2 sticks)
2 1/4 cups brown sugar
1 cup light corn syrup
1 14-oz can sweetened condensed milk
1 tsp vanilla extract

Cut butter into evenly sized cubes and melt over low heat in large 3-4 quart saucepan.
Once butter is fully melted, add brown sugar, being careful to avoid the sides of the pan. If any stray sugar crystals fall onto side of pan, carefully brush off with a wet pastry brush.
Once butter and sugar are fully combined, add corn syrup and condensed milk. Clip on candy thermometer to side of pan.
Cook mixture on low heat (still continually stirring) for about a minute or two. Increase heat to medium and continue to cook/ stir until mixture reaches 225 degrees. Once the mixture is removed from heat, stir in vanilla extract.

NOTE: If caramel is too thick, simply reheat and add in some heavy cream until combined.

Swiss Meringue Buttercream:
1 cup sugar
4 egg whites
3 sticks unsalted butter (at room temperature)
1 tbsp vanilla extract

Heat sugar, egg whites, and salt in a heatproof mixer bowl set over a pan of simmering water, whisking until sugar dissolves and mixture registers 160 degrees on a candy thermometer.

Return bowl to mixer, and whisk, gradually increasing speed from low to medium-high, until stiff, glossy peaks form, about 10 minutes. Reduce speed to medium. Add butter, a few pieces at a time, whisking well after each addition. Whisk in vanilla. Switch to a paddle attachment and beat until air bubbles are gone, 2 to 3 minutes more.

To assemble the cupcakes:

Once cupcakes are cool, core out the center of each one. Using a pastry bag, pipe a small amount of caramel sauce, then pipe coffee mousse until the center is almost full, and then top with another piping of caramel. Once all cupcakes are filled, pipe swiss meringue buttercream onto each one using a pastry bag fitted with a large star tip. Lastly, use a sturdy plastic freezer bag or disposable plastic pastry bag with a small hole cut out of it and drizzle caramel on top of each cupcake.

Monday, June 20, 2011

Dole Whip Cupcakes


This past weekend Ali and I threw an engagement party for one of our favorite couples, Frank and Jess. In honor of how much we have taking impromptu week night trips to Disneyland with them, the theme was a "Vintage Disneyland" theme. One of the items I made for the party was an homage to the beloved Dole Whip, sold at the Tiki Room Dole Bar.


The cupcake is a yellow cake, brushed with pineapple syrup, filled with pineapple curd and topped with pineapple french buttercream. My FAVORITE part of the cupcake was the pineapple curd in the center- it tasted just like the Dole Whip soft serve.


For the Cupcakes (recipe courtesy of Martha Stewart Online:
1 1/2 cups AP Flour
1 1/2 cups cake flour
2 tsp baking powder
1/2 tsp salt
2 sticks unsalted butter, softened
1 3/4 cups granulated sugar
4 eggs
1 1/4 cups whole milk

For Pineapple Glaze:
One can pineapple

Sift all of the dry ingredients together. Set aside. Cream sugar and butter together until light and fluffy. Add in eggs, one at a time. Add 2/3 flour mixture to wet ingredients and mix just until almost combined. Add in the milk. Add in the remaining flour mixture and mix until combined.

Bake at 350 degrees for about 20 minutes, or until cupcakes spring back to the touch.

For the Pineapple Puree:

Place 3-4 cups of fresh pineapple in blender with two tablespoons of water. Set blender to puree setting and puree until fully smooth. Pour through a sieve before using.

For the Pineapple Curd:
-1 cup fresh pineapple puree
-2 egg yolks
-1/3 cup granulated sugar
-2 tsp corn starch
-2 tbsp unsalted butter

Combine puree, yolks, sugar, and corn starch in a small saucepan over medium heat. Whisk continually until mixture thickens. Remove from heat and add butter. Whisk until combined. Pour mixture through a fine mesh sieve and place in fridge to cool.

For the French Buttercream
-1 cup sugar
-1/3 cup water
-2 eggs
-3 1/2 sticks unsalted butter
-1 tsp vanilla extract
-1/4 cup pineapple puree

Place eggs in mixer and mix with whisk attachment until foamy. Meanwhile, place water and sugar in a small sauce pan over medium heat, stirring. Continue boiling until mixture reaches 240 degrees on a candy thermometer. Pour hot syrup into eggs as mixer is running. Make sure to pour slowly and aim for the center of the bowl. Continue whipping until mixture is fully cooled. Add butter a piece at a time, mixing well after each addition. Once butter is all added, switch to a paddle attachment and beat for another 2 minutes or so.

To Assemble:
Once cupcakes are cooled, core out the center of each one.
Next, brush a light coating of pineapple juice from canned pineapple onto the top of each cupcake. Or, if you have more time, you can create a simple syrup from fresh juice and sugar. Using a pastry bag, fill the center of each cupcake with pineapple curd. Once all cupcakes are filled, frost each one with pineapple buttercream using a pastry bag fitted with a large star tip. Garnish with a maraschino cherry umbrella spear.

Thursday, June 9, 2011

Woodland Themed Baby Shower

A couple weekends ago I baked for a Woodland themed baby shower that my sister-in-law threw for her good friend Joy. Brandy, Joy's sister (who made the terrariums) and everyone else involved in the planning and decor did an amazing job. Jennifer Jasso took all of the photos and they turned out so awesome, it blew my mind.

The dessert items I made included chocolate faux bois ("false wood") cupcakes, vegan vanilla cupcakes with passion fruit frosting, vanilla and passion fruit french macarons, vegan peanut butter ball pops, and onesie sugar cookies.


Photography by Jennifer Jasso


Unprofessional close-ups of the goods (below):